【机器学习】Whisper:开源语音转文本(speech-to-text)大模型实战
一、引言
上一篇对ChatTTS文本转语音模型原理和实战进行了讲解,第6次拿到了热榜第一🏆。今天,分享其对称功能(语音转文本)模型:Whisper。Whisper由OpenAI研发并开源,参数量最小39M,最大1550M,支持包含中文在内的多种语言。由于其低资源成本、优质的生存效果,被广泛应用于音乐识别、私信聊天、同声传译、人机交互等各种语音转文本场景,且商业化后价格不菲。今天免费分享给大家,不要再去花钱买语音识别服务啦!
二、Whisper 模型原理
2.1 模型架构
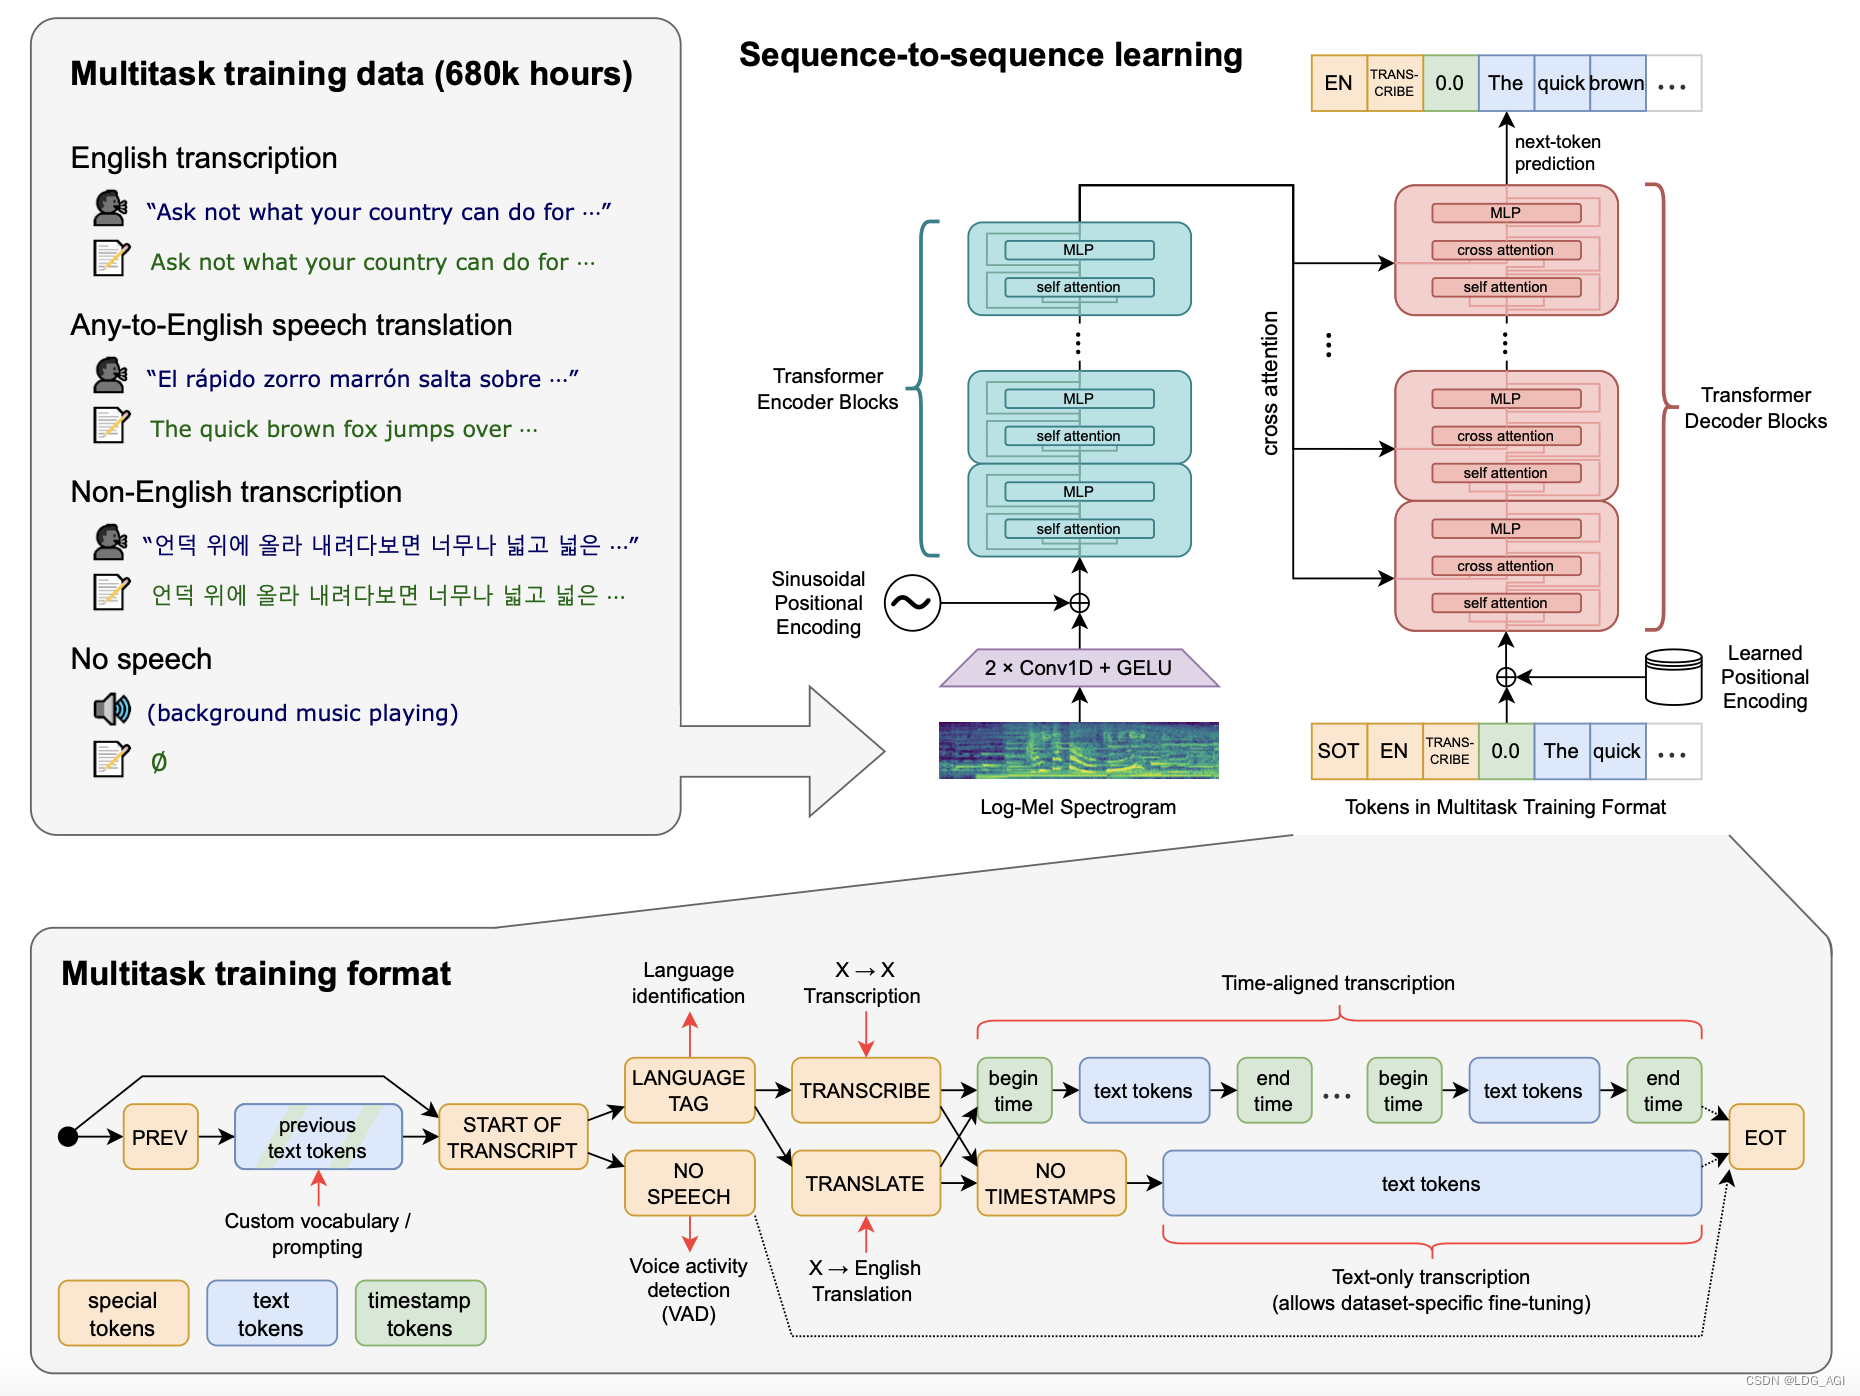
Whisper是一个典型的transformer Encoder-Decoder结构,针对语音和文本分别进行多任务(Multitask)处理。

2.2 语音处理
Whisper语音处理:基于680000小时音频数据进行训练,包含英文、其他语言转英文、非英文等多种语言。将音频数据转换成梅尔频谱图,再经过两个卷积层后送入 Transformer 模型。
2.3 文本处理
Whisper文本处理:文本token包含3类:special tokens(标记tokens)、text tokens(文本tokens)、timestamp tokens(时间戳),基于标记tokens控制文本的开始和结束,基于timestamp tokens让语音时间与文本对其。
仅用通俗易懂的语言描述了下Whisper的原理,如果想更深入的了解,请参考OpenAI官方Whisper论文。
三、Whisper 模型实战
3.1 环境安装
本文基于HuggingFace的transfomers库,采用pipeline方式进行极简单的模型实用实战,具体的pipeline以及其他transformers模型使用方式可以参考我之前的文章。
所以,您仅需要安装transformers库。
pip install transformers当前,语音经常会和视频等其他媒介联系起来,所以我建议您顺带安装多媒体处理工具ffmpeg,没有提供pip库,仅能依靠apt-get安装。
sudo apt-get update && apt-get install ffmpeg3.2 模型下载
基于pipeline会自动进行模型下载,当然,如果您的网速不行,请替换HF_ENDPOINT为国内镜像。
os.environ["HF_ENDPOINT"] = "https://hf-mirror.com"

transcriber = pipeline(task="automatic-speech-recognition", model="openai/whisper-medium")
不同尺寸模型参数量、多语言支持情况、需要现存大小以及推理速度如下

3.3 模型推理
推理函数仅需2行,非常简单,基于pipeline实例化1个模型对象,将要转换的音频文件传至模型对象中即可:
def speech2text(speech_file):
    transcriber = pipeline(task="automatic-speech-recognition", model="openai/whisper-medium")
    text_dict = transcriber(speech_file)
    return text_dict
3.4 完整代码
运行完整代码:
python run_whisper.py -a output_video_enhanced.mp3 完整代码如下:
import os
os.environ["HF_ENDPOINT"] = "https://hf-mirror.com"
os.environ["CUDA_VISIBLE_DEVICES"] = "2"
os.environ["TF_ENABLE_ONEDNN_OPTS"] = "0"

from transformers import pipeline
import subprocess

def speech2text(speech_file):
    transcriber = pipeline(task="automatic-speech-recognition", model="openai/whisper-medium")
    text_dict = transcriber(speech_file)
    return text_dict

import argparse
import json
def main():
    parser = argparse.ArgumentParser(description="语音转文本")
    parser.add_argument("--audio","-a", type=str, help="输出音频文件路径")

    args = parser.parse_args()
    print(args)

    text_dict = speech2text(args.audio)
    #print("视频内的文本是:\n" +  text_dict["text"])
    print("视频内的文本是:\n"+ json.dumps(text_dict,indent=4))

if __name__=="__main__":
    main()
这里采用argparse处理命令行参数,将mp3音频文件输入后,经过speech2text语音转文本函数处理,返回对应的文本,结果如下:

3.5 模型部署
如果想将该服务部署成语音识别API服务,可以参考之前的FastAPI相关文章。
四、总结
本文是上一篇chatTTS文章的夫妻篇,既然教了大家如何将文本转语音,就一定要教大家如何将语音转成文本,这样技术体系才完整。首先简要概述了Whisper的模型原理,然后基于transformers的pipeline库2行代码实现了Whisper模型推理,希望可以帮助到大家。码字不易,如果喜欢期待您的关注+3连+投票。
原文链接:https://blog.csdn.net/weixin_48007632/article/details/140046145
0 人喜欢
There is no comment, let's add the first one.
